Scaling up: bringing your Azure DevOps CI/CD setup to the next level 🚀 (on Xebia.com ⧉)

Introduction
Azure DevOps pipelines are a great way to automate your CI/CD process. Most often, they are configured on a per project basis. This works fine when you have few projects. But what if you have many projects? In this blog post, we will show you how you can scale up your Azure DevOps CI/CD setup for reusability and easy maintenance.
Your typical DevOps pipeline
A typical DevOps pipeline is placed inside the project repository. Let’s consider a pipeline for a Python project. It includes the following steps:
- quality checks such as code formatting and linting
- building a package such as a Python wheel
- releasing a package to Python package registry (such as Azure Artifacts or PyPi)
Using an Azure DevOps pipeline, we can achieve this like so:
trigger:
- main

steps:
# Python setup & dependencies
- task: UsePythonVersion@0
  inputs:
    versionSpec: 3.10

- script: |
    pip install .[dev,build,release]
  displayName: 'Install dependencies'

# Code Quality
- script: |
    black --check .
  displayName: 'Formatting'

- script: |
    flake8 .
  displayName: 'Linting'

- script: |
    pytest .
  displayName: 'Testing'

# Build
- script: |
    echo $(Build.BuildNumber) > version.txt
  displayName: 'Set version number'

- script: |
    pip wheel \
      --no-deps \
      --wheel-dir dist/ \
      .
  displayName: 'Build wheel'

# Publish
- task: TwineAuthenticate@1
  inputs:
    artifactFeed: 'better-devops-pipelines-blogpost/devops-pipelines-blogpost'
  displayName: 'Authenticate pip with twine'

- script: |
    twine upload \
      --config-file $(PYPIRC_PATH) \
      --repository devops-pipelines-blogpost \
      dist/*.whl
  displayName: 'Publish wheel with twine'
Well, that is great, right? We have achieved all the goals we desired:
- Code quality checks using black, flake8 and pytest.
- Build and package the project as a Python wheel.
- Publish the package to a registry of choice, in this case Azure Artifacts.
Growing pains
A DevOps pipeline like the above works fine for a single project. But, … what if we want to scale up? Say our company grows, we create more repositories and more projects need to be packaged and released. Will we simply copy this pipeline and paste it into a new repository? Given that we are growing in size, can we be more efficient than just running this pipeline from start to finish?
The answer is no – we do not have to copy/paste all these pipelines into a new repo, and the answer is yes – we can be more efficient in running these pipelines. Let’s see how.
Scaling up properly
Let’s see how we can create scalable DevOps pipelines. First, we are going to introduce DevOps pipeline templates. These are modular pieces of pipeline that we can reuse across various pipelines and also across various projects residing in different repositories.
Let’s see how we can use pipeline templates to our advantage.
1. DevOps template setup
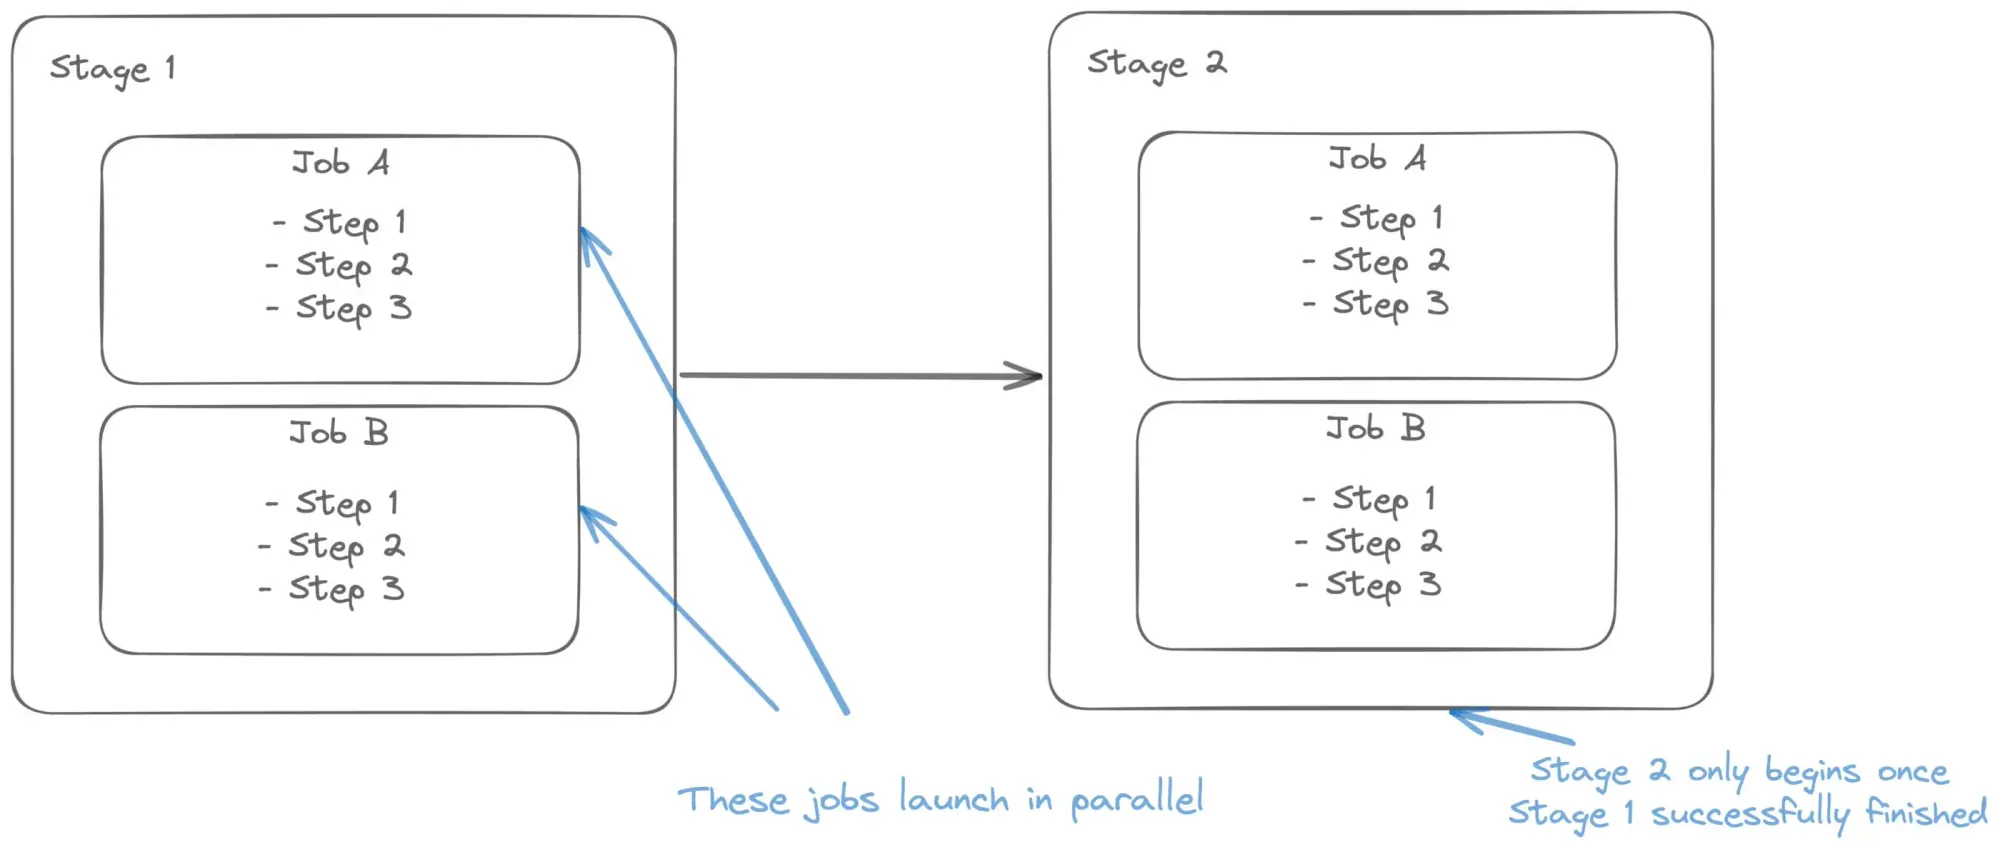
Let’s rewrite pieces of our pipeline into DevOps pipeline templates. Important to know here is that you can write templates for either stages, jobs or steps. The hierarchy is as follows:
stages:
- stage: Stage1
  jobs:
  - job: Job1
    steps:
    - step: Step1
This can be illustrated in an image like so:
We can then create a template in one file, for example for steps:
templates/code-quality.yml
steps:
- script: |
    echo "Hello world!"
.. and reuse it in our former pipeline:
stages:
- stage: Stage1
  jobs:
  - job: Job1
    steps:
    - template: templates/code-quality.yml
… or for those who prefer a more visual way of displaying it:
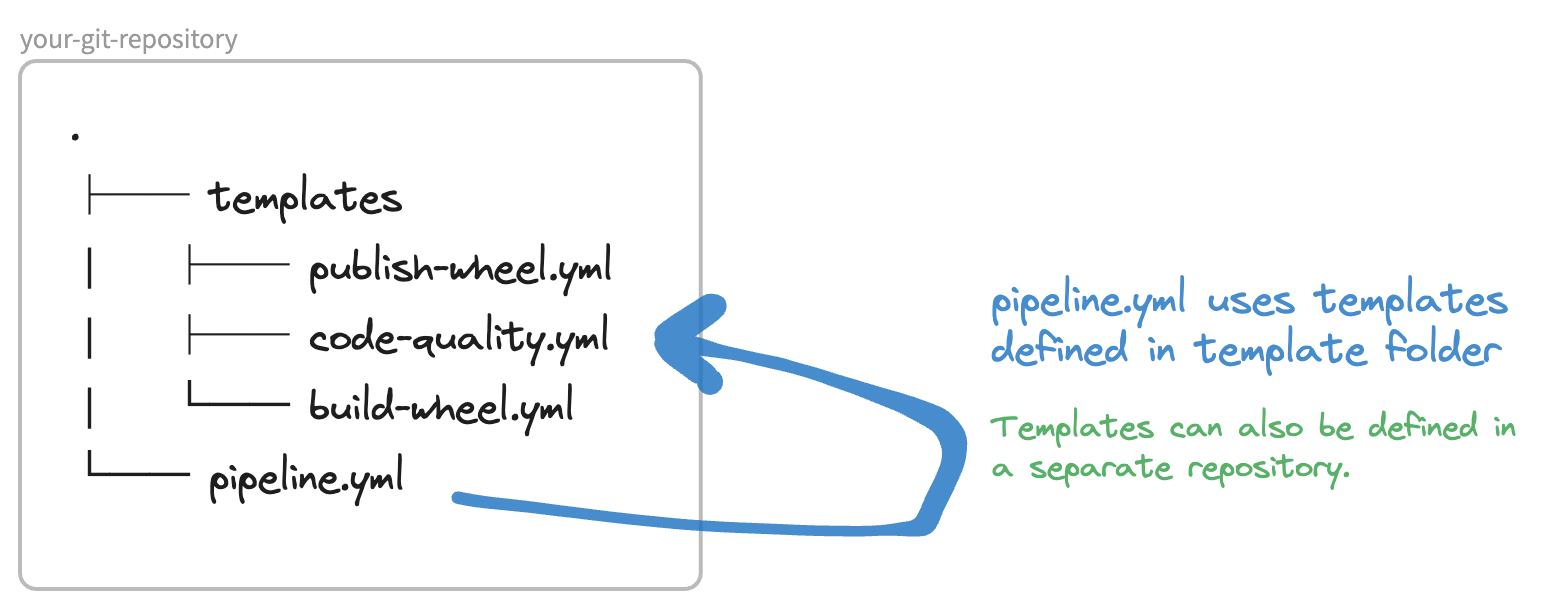
That’s how easy it is to use DevOps pipeline templates! Let’s now apply it to our own usecase.
Code quality checks template
First, let’s put the code quality checks pipeline into a template. We are also making the pipeline more extensive so it outputs test results and coverage reports. Remember, we are only defining this template once and then reusing it in other places.
templates/code-quality.yml
steps:
# Code Quality
- script: |
    black --check .
  displayName: 'Formatting'

- script: |
    flake8 .
  displayName: 'Linting'

- script: |
    pytest \
      --junitxml=junit/test-results.xml \
      --cov=. \
      --cov-report=xml:coverage.xml \
      .
  displayName: 'Testing'

# Publish test results + coverage
- task: PublishTestResults@2
  condition: succeededOrFailed()
  inputs:
    testResultsFiles: '**/test-*.xml'
    testRunTitle: 'Publish test results'
    failTaskOnFailedTests: true
  displayName: 'Publish test results'

- task: PublishCodeCoverageResults@1
  inputs:
    codeCoverageTool: 'Cobertura'
    summaryFileLocation: '**/coverage.xml'
  displayName: 'Publish test coverage'
… which we are using like so:
steps:
- template: templates/code-quality.yml
Easy! Also note we included two additional tasks: one to publish the test results and another to publish code coverage reports. That information is super useful to display inside DevOps. Lucky for us, DevOps has support for that:
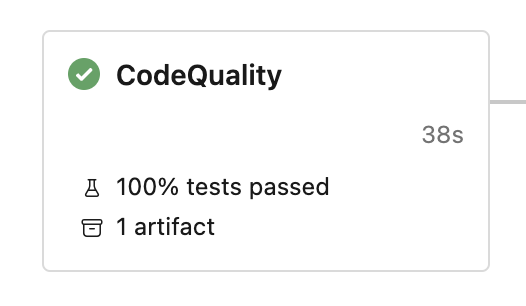
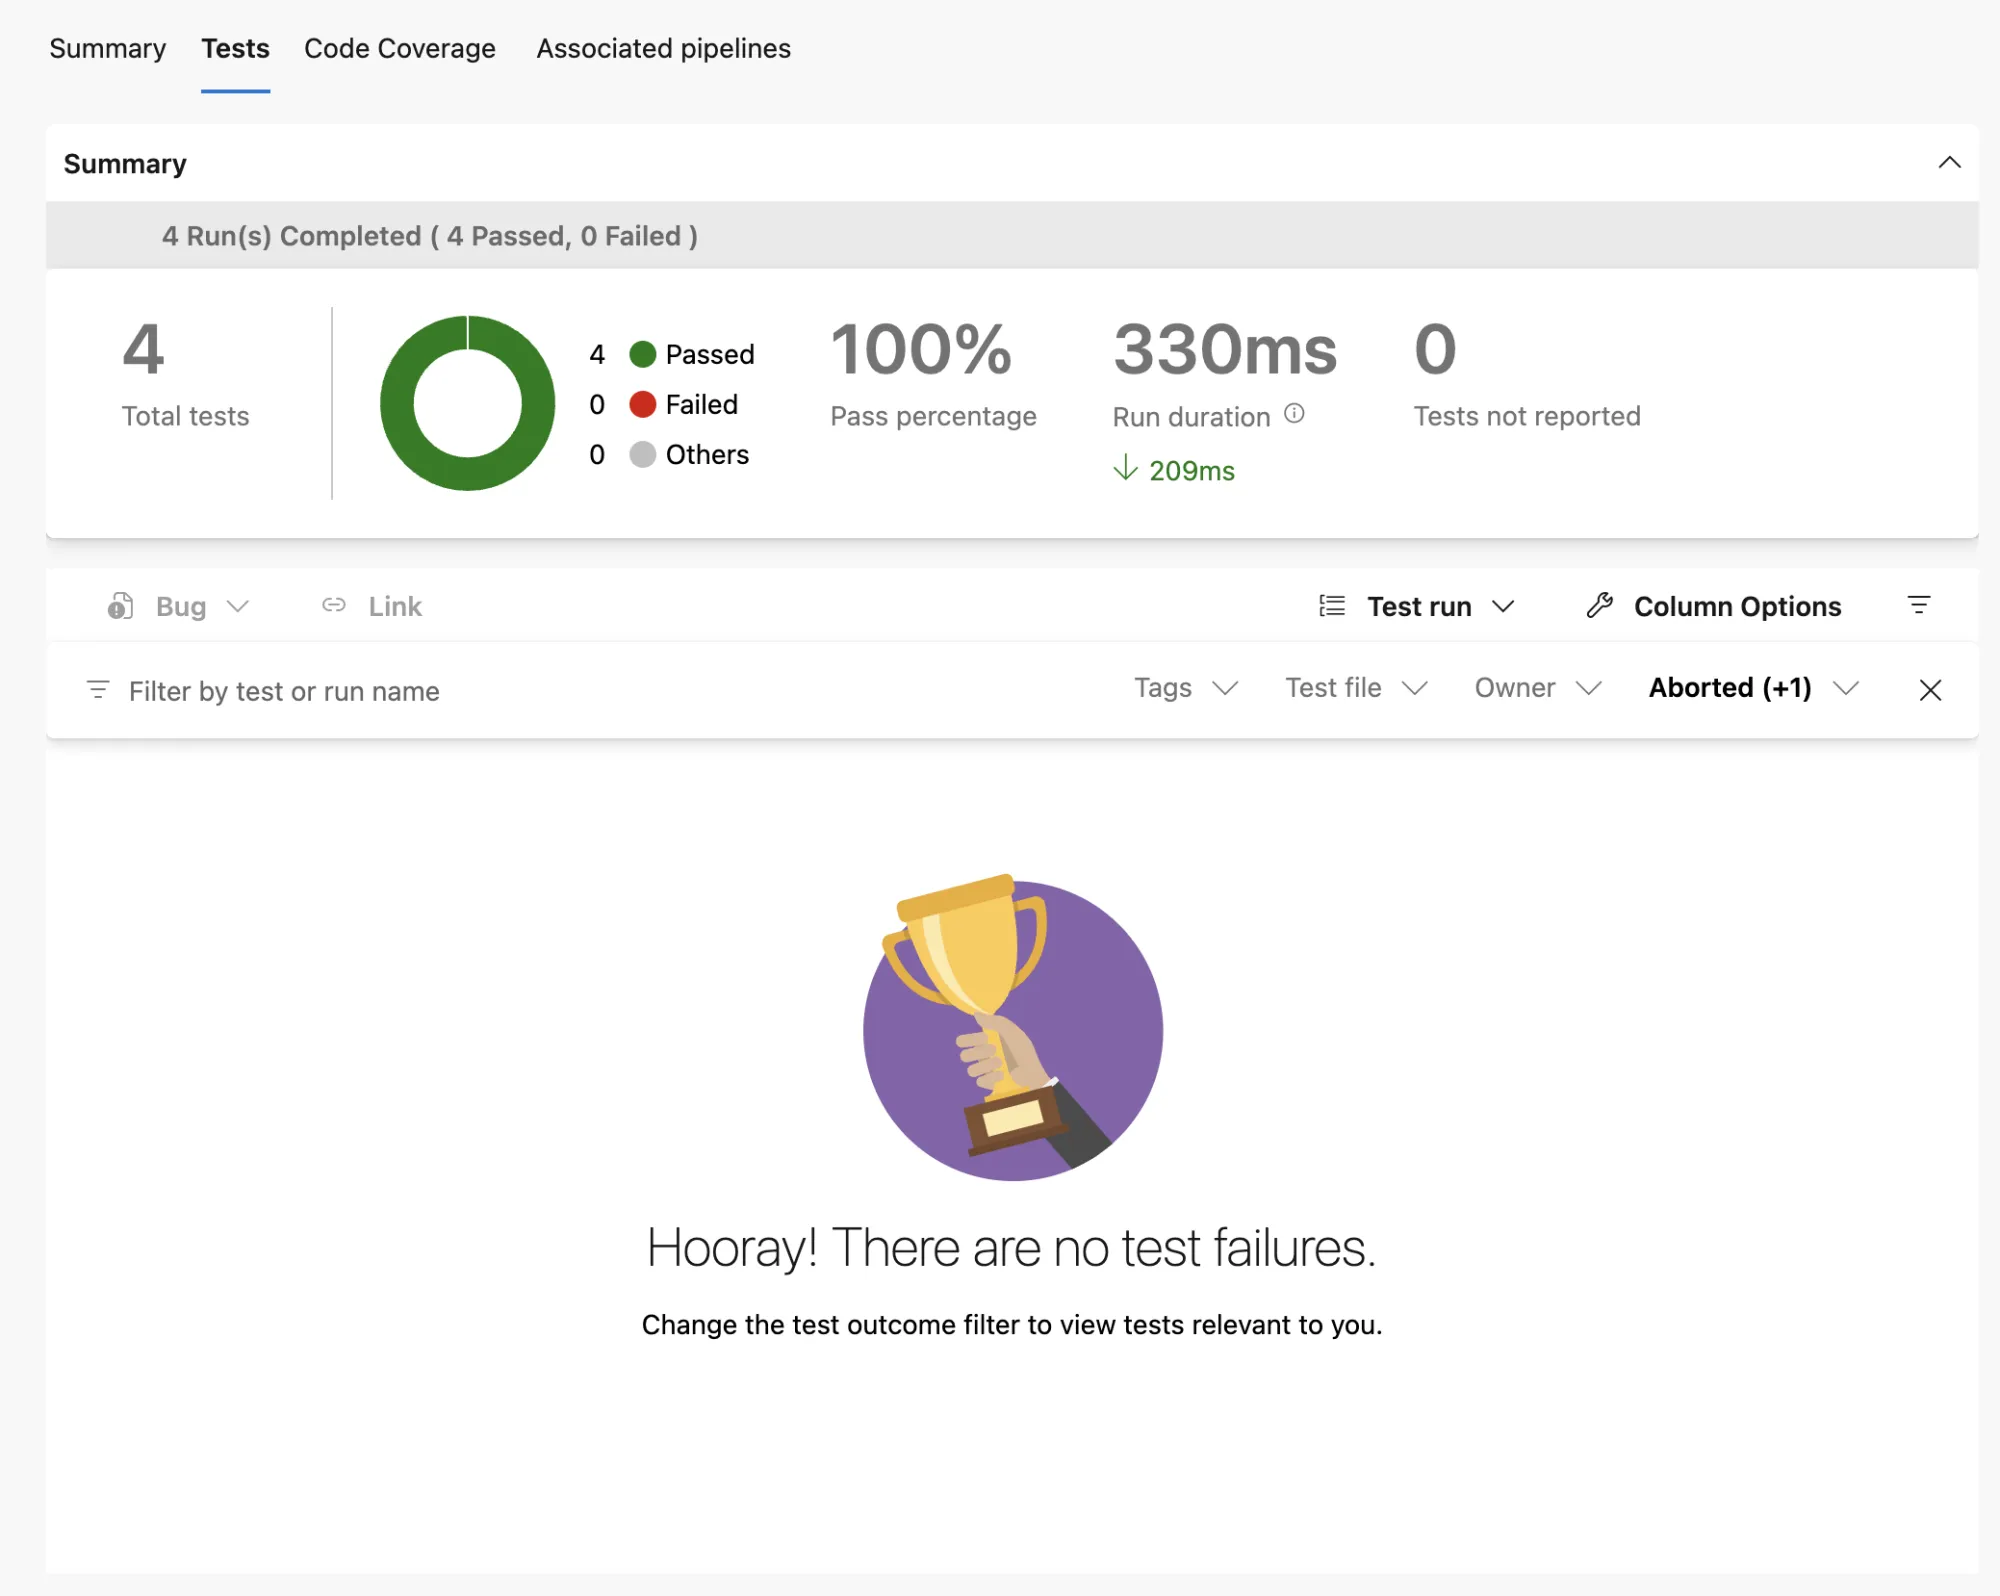
… clicking on the test results brings us to the Tests view, where we can exactly which test failed (if any failed):
Lastly, there’s also a view explaining which lines of code you covered with tests and which you did not:
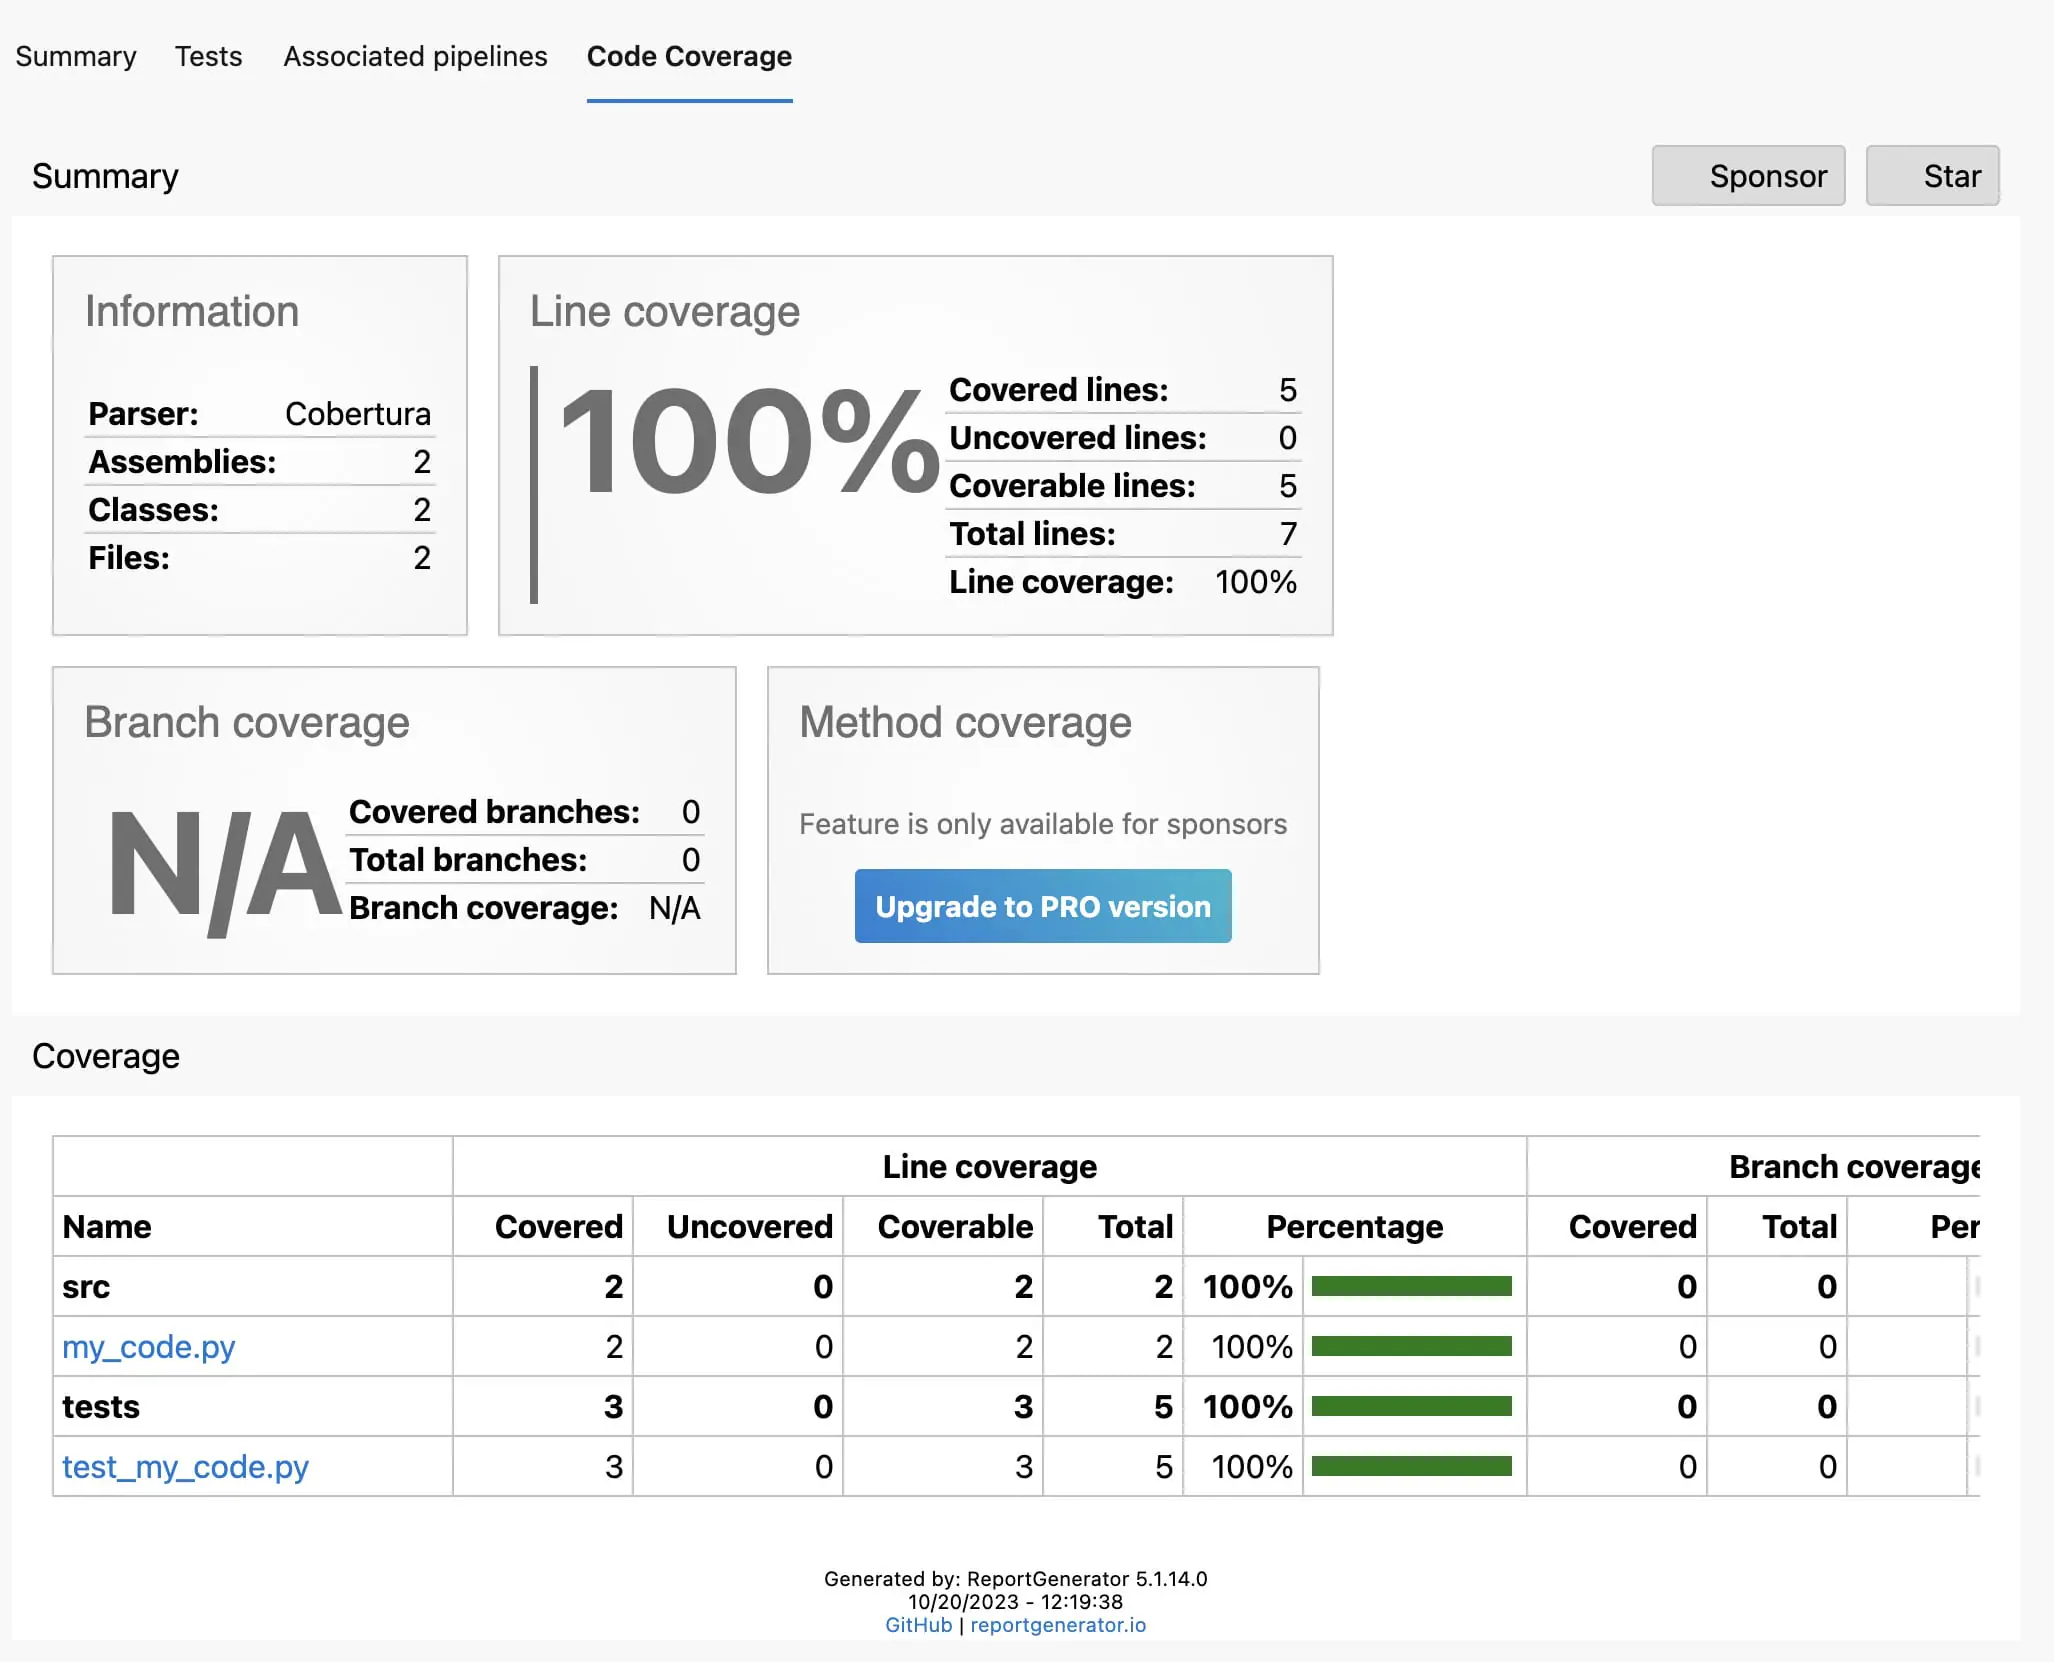
Those come in very useful when you are working on testing your code!
Now, we have defined this all in DevOps templates. That gives us a more comfortable position to define more elaborate pipeline steps because we will import those templates instead of copy/pasting them.
That said, we can summarise the benefits of using DevOps templates like so:
- Define once, reuse everywhere
We can reuse this code quality checks pipeline in both the same project multiple times but also from other repositories. If you are importing from another repo, see ‘Use other repositories‘ for setup. - Make it failproof
You can invest into making just this template very good; instead of having multiple bad versions hanging around in your organisation. - Reduce complexity
Abstracting away commonly used code can be efficient for the readability of your pipeline. This allows newcomers to easily understand the different parts of your CI/CD setup using DevOps pipelines.
2. Passing data between templates
Let’s go a step further and also abstract away the build and release steps into templates. We are going to use the following template for building a Python wheel:
steps:
# Build wheel
- script: |
    echo $(Build.BuildNumber) > version.txt
  displayName: 'Set version number'

- script: |
    pip wheel \
      --no-deps \
      --wheel-dir dist/ \
      .
  displayName: 'Build wheel'

# Upload wheel as artifact
- task: CopyFiles@2
  inputs:
    contents: dist/**
    targetFolder: $(Build.ArtifactStagingDirectory)
  displayName: 'Copy wheel to artifacts directory'

- publish: '$(Build.ArtifactStagingDirectory)/dist'
  artifact: wheelFiles
  displayName: 'Upload wheel as artifact'
This definition is slightly different than the one we defined before, in the initial pipeline. This pipeline uses artifacts. These allow us to pass data between jobs or stages. This is useful when we want to split up our pipeline into smaller pieces. Splitting up the process into smaller segments gives us more visibility and control over the process. Another benefit of this, is that when we split the Python wheel build and release process, is that we give ourselves the ability to release to multiple providers at once.
When this pipeline is ran we can see an artifact (a wheel file) has been added:
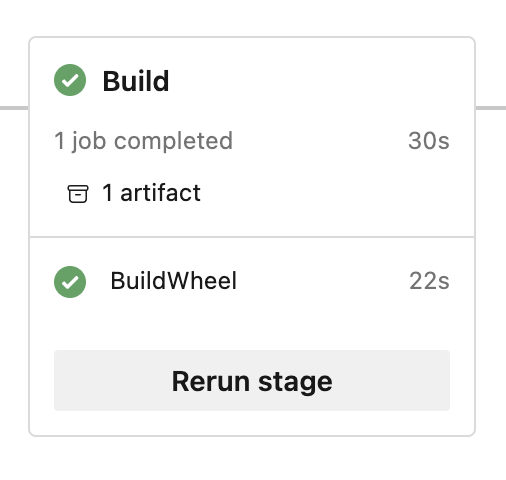
… with the actual wheel file in there:
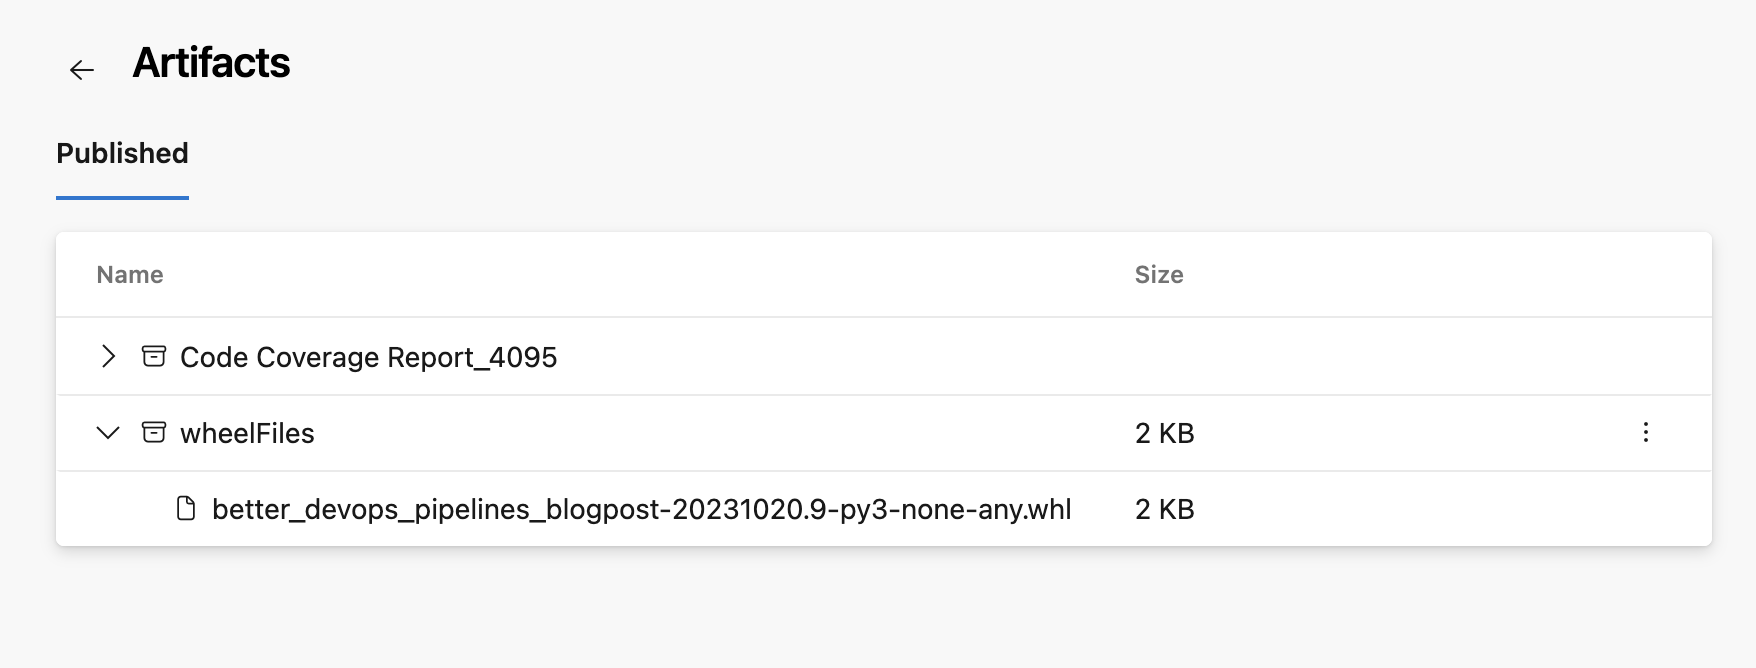
This is also useful so we can inspect what the build pipeline has produced. We can now download this wheel file from the artifacts again. We will do this in the publish pipeline.
template/publish-wheel.yml
parameters:
- name: artifactFeed
  type: string
- name: repositoryName
  type: string

steps:
# Retrieve wheel
- download: current
  artifact: wheelFiles
  displayName: 'Download artifacts'

# Publish wheel
- task: TwineAuthenticate@1
  inputs:
    artifactFeed: ${{ parameters.artifactFeed }}
  displayName: 'Authenticate pip with twine'

- script: |
    twine upload \
      --config-file $(PYPIRC_PATH) \
      --repository ${{ parameters.repositoryName }} \
      $(Pipeline.Workspace)/wheelFiles/*.whl
  displayName: 'Publish wheel with twine'
… both the build- and release pipeline can be used like so:
- stage: Build
  jobs:
  - job: BuildWheel
    steps:
    - task: UsePythonVersion@0
      inputs:
        versionSpec: 3.10

    - script: |
        pip install .[build]
      displayName: 'Install dependencies'

    - template: templates/build-wheel.yml


- stage: Publish
  jobs:
  - job: PublishWheel
    steps:
    - script: |
        pip install twine==4.0.2
      displayName: 'Install twine'

    - template: templates/publish-wheel.yml
      parameters:
        artifactFeed: 'better-devops-pipelines-blogpost/devops-pipelines-blogpost'
        repositoryName: 'devops-pipelines-blogpost'
And here we have another new feature coming in. Stages. These allow us to execute pipelines that depend on each other. We have now split up our pipeline into 2 stages:
- Build stage
- Publish stage
Using stages makes it easy to see what is going on. It provides transparency and allows you to easily track the progress of the pipeline. You can also launch stages separately, skipping previous stages, as long as the necessary dependencies are in place. For example, dependencies can include artifacts, which were generated in previous stage.
Improving the release process
So what is another advantage of this setup? Say that you are releasing your package to two pip registries. Doing that is easy using this setup by creating two jobs in the publish stage:
- stage: Publish
  jobs:
  - job: PublishToRegistryOne
    steps:
    - script: |
        pip install twine==4.0.2
      displayName: 'Install twine'

    - template: templates/publish-wheel.yml
      parameters:
        artifactFeed: 'better-devops-pipelines-blogpost/registry-1'
        repositoryName: 'devops-pipelines-blogpost'

  - job: PublishToRegistryTwo
    steps:
    - script: |
        pip install twine==4.0.2
      displayName: 'Install twine'

    - template: templates/publish-wheel.yml
      parameters:
        artifactFeed: 'better-devops-pipelines-blogpost/registry-2'
        repositoryName: 'devops-pipelines-blogpost'
As you can see, we can use the defined templates to scale our pipelines. What is essential here, is that thanks to using the artifacts, we can build our wheel once and consume that same wheel multiple times.
Additionally, the publishing jobs launch in parallel by default (unless dependencies are explicitly defined). This speeds up your release process.
3. Automate using a strategy matrix
Let’s go back to the code quality stage for a minute. In the code quality stage, we are first installing a certain Python version, and then running all quality checks. However, we might need guarantees that our code works for multiple Python versions. This is often the case when releasing a package, for example. How can we easily automate running our Code Quality pipeline using our pipeline templates? One option is to manually define a couple jobs and install the correct python version in each job. Another option is to use a strategy matrix. This allows us to define a matrix of variables that we can use in our pipeline.
We can improve our CodeQualityChecks job like so:
jobs:
- job: CodeQualityChecks
  strategy:
    matrix:
      Python38:
        python.version: '3.8'
      Python39:
        python.version: '3.9'
      Python310:
        python.version: '3.10'
      Python311:
        python.version: '3.11'

  steps:
  - task: UsePythonVersion@0
    inputs:
      versionSpec: $(python.version)

  - script: |
      pip install .[dev]
    displayName: 'Install dependencies'

  - template: templates/code-quality.yml
Awesome! The pipeline now runs the entire code quality pipeline for each Python version. Looking at how our pipeline runs now, we can see multiple jobs, one for each Python version:
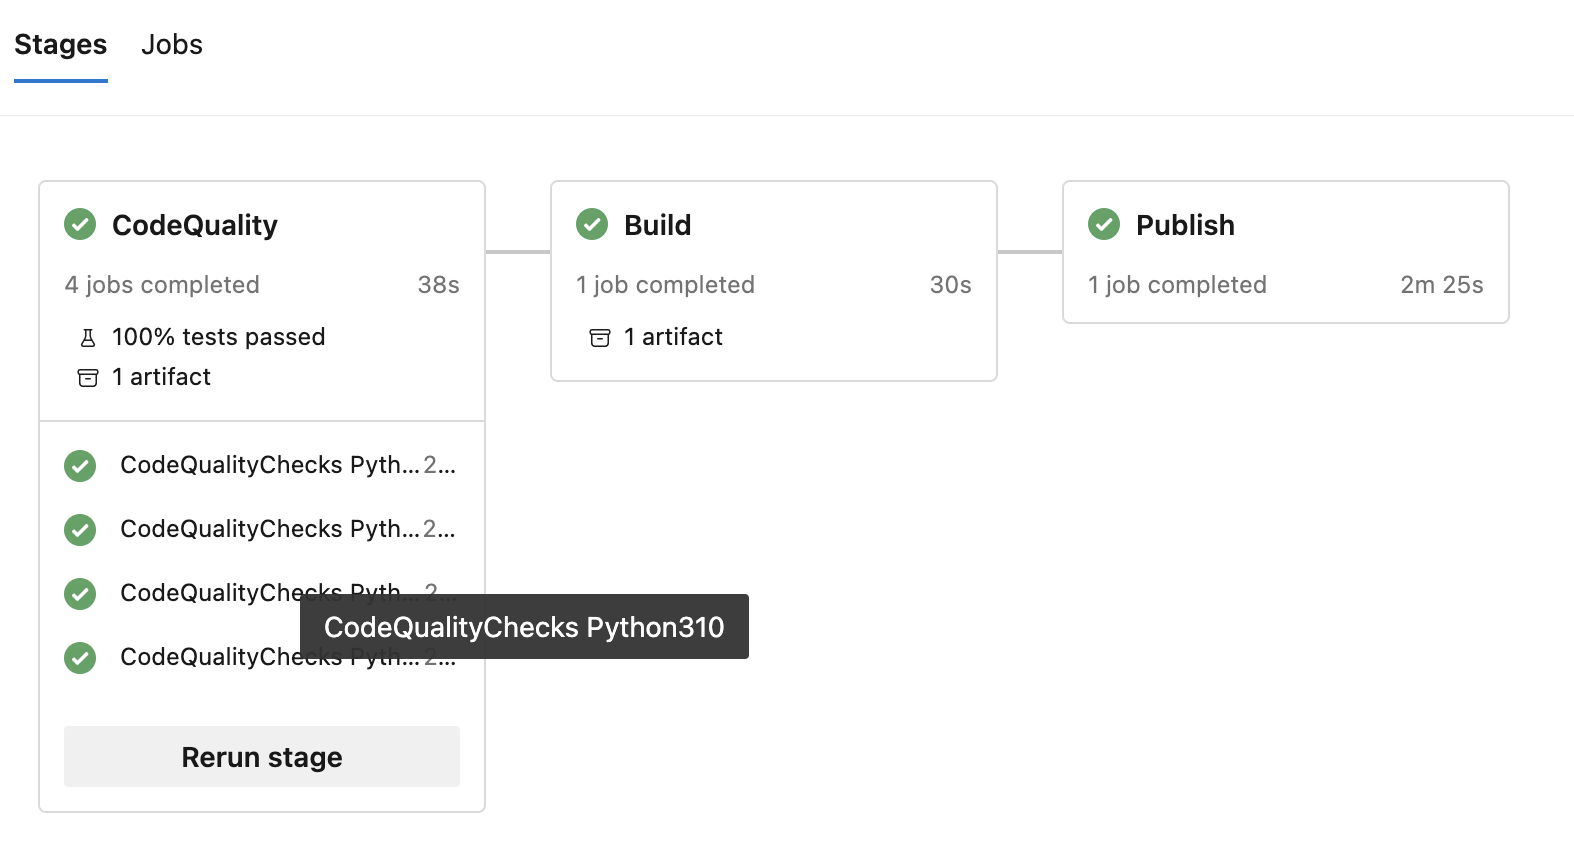
.. as you can see 4 jobs are launched. If no job dependencies are explicitly set, jobs within one stage run in parallel! That greatly speed up the pipeline and lets you iterate faster! That’s definitely a win.
Final result
Let’s wrap it up! Our entire pipeline, using templates:
trigger:
- main

stages:
- stage: CodeQuality
  jobs:
  - job: CodeQualityChecks
    strategy:
      matrix:
        Python38:
          python.version: '3.8'
        Python39:
          python.version: '3.9'
        Python310:
          python.version: '3.10'
        Python311:
          python.version: '3.11'

    steps:
    - task: UsePythonVersion@0
      inputs:
        versionSpec: $(python.version)

    - script: |
        pip install .[dev]
      displayName: 'Install dependencies'

    - template: templates/code-quality.yml


- stage: Build
  jobs:
  - job: BuildWheel
    steps:
    - task: UsePythonVersion@0
      inputs:
        versionSpec: 3.10

    - script: |
        pip install .[build]
      displayName: 'Install dependencies'

    - template: templates/build-wheel.yml


- stage: Publish
  jobs:
  - job: PublishWheel
    steps:
    - script: |
        pip install twine==4.0.2
      displayName: 'Install twine'

    - template: templates/publish-wheel.yml
      parameters:
        artifactFeed: 'better-devops-pipelines-blogpost/devops-pipelines-blogpost'
        repositoryName: 'devops-pipelines-blogpost'
… which uses these templates:
… for the entire source code see the better-devops-pipelines-blogpost repo. The repository contains pipelines that apply above explained principles. The pipelines provide testing, building and releasing for a Python project ✓.
Conclusion
We demonstrated how to scale up your Azure DevOps CI/CD setup making it reusable, maintainable and modular. This helps you maintain a good CI/CD setup as your company grows.
In short, we achieved the following:
- Create modular DevOps pipelines using templates. This makes it more easy to reuse pipelines across projects and repositories
- Pass data between DevOps pipeline jobs using artifacts. This allows us to split up our pipeline into smaller pieces, that can consume artifacts from previous jobs.
- Split up your pipeline in stages to create more visibility and control over your CI/CD
An example repository containing good-practice pipelines is available at:
https://dev.azure.com/godatadriven/_git/better-devops-pipelines-blogpost
Cheers 🙏